.svg)
.svg)
.svg)


.svg)


.svg)
.svg)

.svg)


Configure PEER-TO-PEER Replication
1) First, configure three SQL servers, here in this example I am using three SQL server 2014 instances.
Geopits-PC5 as instance 1
Geopits-PC5\Test1 as instance 2 and
Geopits-PC5\Test2 as instance 3.
2) Next, take a full backup of the database for which you want to configure peer to peer replication and restore this full backup on the other two servers.
3) Now, configure distribution to all three servers, i.e. for all three nodes: node 1, node 2 and node 3.
4) Choose the distributor server. Click next.
5) Specify the network path where you need to store the snapshot.
6) Here select the folder location for distribution database files. Click next.
7) Configure the publishers and distribution database, click next and tick the configure distribution option and click finish to complete the distribution wizard. Repeat this distribution configuration step for the remaining two servers.
8) Click configure distribution option and click next and finish the setup.
9) Once all three nodes are done configuring distribution, the next step is to create the publisher for all the server nodes. To do this, go to any instance (in the below example I use the first server), expand the replication folder, right click the new publisher folder and select create new publisher option.
10) Select and confirm the database to be published and click next.
11) In this step click the peer-to-peer publication option and click next.
12) Here select the articles that need to be published and click next.
13) Now configure agent security setting, in this example I choose to run under the SQL server agent account but for best practice it is recommended to create a separate login account.
14) Click next to create the publication and finish the configuration setup.
15) Next we need to configure publication for the other two servers. Now on the first instance right click on the configured publication and select configure the peer to peer topology option.
16) Once the peer to peer topology wizard appears, click next.
17) Select the publisher for the database and click next.
18) Once the topology is configured, the following window will give information about the publisher details and distributor details. Here the important thing to notice is the peer-originated id, by default it is set to 100 for the first node.
19) Now, right click on the empty area and add the new peer node, then click ok.
20) Choose which server you want it to join the topology; here I configure the second server as node 2.
21) Now add the new peer node for the second server. The peer-originated id should be unique for all the servers, here in this example I have set the peer-originated id as 200 for this server.
22) Similarly add and configure the new peer node for the third server as node 3.
23) For the third node set the peer-originated id as 300 and click ok.
24) Next right click on node 1 and select the option connect to all displayed nodes. Do the same with the other two nodes.
25) Once all the nodes are connected to each other, the topology will look as shown below, then click next.
26) Specify the security for the log reader agents, i.e. for node 1 and 2.
27) In this example, I use run under the SQL server agent service account, and for publisher, by impersonating the process account option, but for best practice, create a login account and use that account for security.
28) After choosing the security agent for log reader, click next.
29) Now select the security agent for the distribution for all three nodes.
30) In this example, I use run under the SQL server agent service account, and for distributor, by impersonating the process account option, but for best practice, create a login account and use that account for security. Click ok and proceed to the next step.
31) Here you will be asked to provide the details of how you want the peer database to be initialized. In our scenario, I have taken the backup from instance one of the database and restored it to the other two instances. During this process no changes occurred to the database in the publisher, since there were no changes taken place to the database, I choose option one. Click next.
32) Now click finish to complete the peer to peer setup topology for all three nodes.
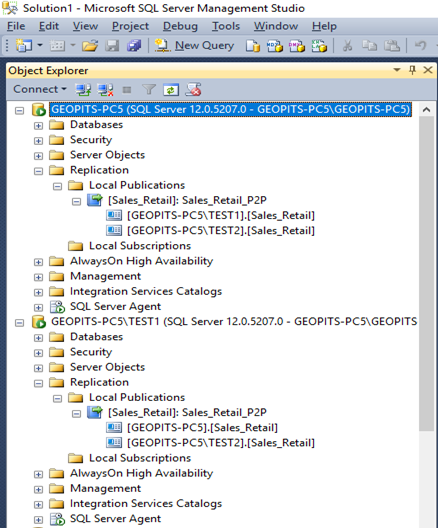
33) Now we can see:
For the first server, publication servers two and three are the subscribers.
For the second server, publication servers one and three are the subscribers.
For the third server, publication servers one and two are the subscribers.
The peer to peer replication is configured completely and is up and running successfully.
.svg)

.svg)